As promised her is a closer look at the album. I decided to make a paper bag mini for two reasons. 1. I am almost out of the chipboard my sweet friend gave me and 2. they are super fun to make.
I really wanted to show every single page on the design team call, but I had to really choose the pictures that I wanted them to judge. Now that we have time let's look a bit closer. ;)
I wanted to make this cover in a non girly way. Esp since I have a son and two daughter and my hubby wants me to include pics of us when we went to school. ;) I put pop dots under to ABC primer cut out so that the wrinkled and distressed look could really pop out.
I love that the ribbon has numbers on it. and the letter stamps are right next to it. It made me think abc's and 123's. Oh great now I have that song stuck in my head.
I love these canvas CTMH stickers. I just knew that they would make this mini rock.
These two flaps fold down so that you can put pics on the back also. It also leaves a large 4x6 area behind them for a photo.
This flap lifts up and there is a photo mat slid into the side of it. I love the old looking ruler. I love these neat little touches that G45 papers add to the paper packs.
What school looking mini album would be complete with out some old looking notebook paper?? This one is shaped like a file folder and is my photo mat.
When I saw the little girl jump roping I knew I had to use it. As you can see the photo mat sits in the side. On a side note my circle punch was one of the best things I have bought.
Again a nice big photo mat.
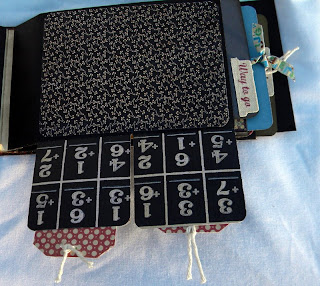
I used the daylights out of these little flash cards. They are sooooooooooooo cute. The ribbons sticking out are alternating abc's and numbers. The other end pulls are twine, I really like a nice thick twine. This flap has a pocket on each side for photo mats.
Here you can see the two tags.
Note book looking paper made from index cards and cut to look like a file folder.
A second set of the folding tag holders.
This is showing the other side. They also operate independent of each other.
I still love these little flash cards.
The little library card is so cute.
The notebook looking paper that says journal is a canvas sticker.
I burned the edges of this. I just really like the pattern it made.
I really like the mini book covers shown on this page of paper. I had the 8x8 paper pack I think I would really like to get the 12x12 paper pack too. You can see a sneak peek at my paper airplane.
I just had to make a flight path for my paper air plane. I think this is one of the coolest stickers I have ever received. I think canvas stickers are the bomb.
I took the pictures outside in my front yard so you can see the shadow that the camera strap left in this picture.
This book title was SO cute I just had to cut it out and use it. I distressed the edges with my scissors to be honest with you. I usually use my TH distress tool, but after making 8 projects in a week and a half I was having trouble fining ANYthing in my craft area. I am happy to report that the craft room was given some much needed TLC today.
nice vertical pocket with a file folder looking photo mat.
This is the inside of the back cover.
This is the spine of the my mini. I really like the way it came out.
Not sure what made me take a pic of the mini from this angle, but I really like seeing the ribbons and twine from the tags. I know maybe I was showing that it all fit neatly inside the covers. ;)
This mini was pretty different for me in the fact that I did not ink anywhere near as much as I usually do. I did ink I just used a very light color and I only inked where I wanted dramatic emphasis.
The paper used was ABC primer (Graphic 45) 8x8 pack, cotton twine, Abc ribbon and numbers ribbon (from Maya road) , cardstock (paperstudio brand), light weight packaging a friend gets for me, vintage photo ink, CTMH black ink, CTMH canvas stickers. I used Following the paper trial with Laura's stack the deck binding. I also used many, many different techniques I have learned from all the amazing youtube videos I have seen over the past few months.
I hope you all enjoyed this closer look. ;)
Please take a minute or two to leave a comment on my audition post if you can.
Have a scraptastic day!!


