Showing posts with label upcycling. Show all posts

Monday, January 18, 2016

What to do with all those vintage books you collected.


Must collect hymnals, vintage books, old encyclopedias, ect., ect., AAAANNNNDDD suddenly you have a huge pile of them. You knew what you were going to do with them when you started collecting them. Maybe  you saw and amazing project on Pinterest, or maybe a Youtube video about junk journals,but now that you have them you either have more than anticipated (since there can never be to many LOL) and are looking for ideas with what to with them.  Well, me too.

Got a  large box of Hymnals for 25 bucks!! I have probably 50 or so.


 Turn them into sketch books.
 How afraid are you of ruining a book that well, frankly you either got for free or are contemplating getting rid of?  I love to practice drawing, I am not very good at it, hence the practicing, but I surly do not feel bad messing up in a book I got for free or for nearly nothing. In my crazy thought pattern "sketch" books are for people who draw well and are artists. If I spend money on one I better only put "worthy" things in it. Am I the only one?? Well, anyway if I use a book I got for free or nearly free I feel like it is ok to have more bad pages then good ones. Here is one I am working on right now: This one is my faces journal/sketch book.
Here is the finished page. I used Neocolor watersoluable crayons to add color and a Sakura white ink pen for the highlights in the eyes.

I glue two pages together and viola, I can draw, paint or watercolor on them. Here I used a Stabilo water pencil and Gesso. I will say that you do have to consider how thin your paper is. This book is over 100 years old so, I have to be very careful with how much I erase and it needs to be dried between wet applications.


As you can see the very fragile pages become very sturdy and workable when you glue two together and then cover the pages you want to draw on with a light coat of gesso.  I have a bunch more of these books, so I will post as I come up with more uses for them.  Thank's for stoping by my blog. I really love feed back and suggestions. Feel free to leave a comment.
Have a creative day!!

Tuesday, May 5, 2015

Inspiration


Hello Everyone!!
I have to tell you a secrete... Lean in close, I am totally addicted to Pinterest. :) Do you harbor the same addiction? I love going onto Pinterest for a while and looking around and letting ideas or quotes  fill me with inspiration. Today I love the project I made. 
The pin led me to a 13@rts page HERE.  I started out my Pinterest search  that day with the determination to use some paintbrushes I had received in a "Palette Kit". I used the painters palette in several other projects, but was left with several not fabulous quality brushes. I have several projects I have done with the leftover brushes. I hope you like them.

Here is the project in its entirety. The letters say "create more art".

Here is a close up of the brushes, I dipped them in modeling paste by Shimmerez called Dazzlers. The color is creamcicle. I  also got a close up of the texture I created by letting the gesso I painted on the canvas bubble slightly.
I got this amazing flower in an embellishment swap about a year ago. The hearts are from a Maya Road warehouse box. I recently found this glass filler product on the Flying Unicorn website. LOVE, love, love.

More of the dazzler texture paste.

I got this bird from Flying Unicorn in their metal finding section. I love it so much.


I hope you liked my variation of the project.  I would like to know where/how do you get inspiration.
Have a great day!!

Friday, April 17, 2015

Mixed media fun

Hi Everyone!!

Here is another mixed media project. I tried to take pictures while I was working on it. I hope you try this project or one similar.

Here is the project when it was finished. The words in the center say " see the beauty in every day things

I used a 8x10 canvas. I actually recycled one that I had glued some music note paper to.  It was rather hideous and I was so happy when inspiration hit.  I honestly hated the original piece so much I did not take a pic of it. :)
I then painted a layer of crackle medium onto the canvas. You can use Elmers clear/gel glue if you do not have crackle medium. there is even a tutorial HERE if you would like to know how.
I then painted the canvas with Apple barrel brand paint in the color Cloudless. I added black India Ink splatters. I let it all dry while I dipped the paint brush tips into paint and set them aside to dry. I also gathered materials from all my stash piles. Metal pieces, scraps of crochet doilies, chipboard pieces, and Flowers. The words are from past Maya Road ware house boxes!!


I got some artist pallets for another project and they came with a full set of (ehhh) paint brushes. Not wanting to throw them away I decided to recycle them and use them on this project.


Before I added gesso. I hate wasting anything so, I used the bottoms of the paint brushes that I cut to fit in the bottom corner.

Still needs to be lighter

Needs a bit more gesso


hmmm, now it seems to fade into the back round too much.


I recently got some 13 arts glass beads, I totally love them. I use them every chance I get.

I love the way the piece of doily peeks out from beneath the chipboard daydream word. If you look really closely you can see the mess that hides underneath.


Here is another close up of the grouping of items covered in gesso and sprayed with white sprays. I thought about going all out and using all my Lindy's and Prima sprays, but I really liked the simplicity of this piece. In the final piece way back up there at the top of the post, I solved the problem of the  groupings fading into the backround by adding a "Halo" or "brightning" effect with some white gesso.
I really hope you enjoyed this piece . Let me know what you think or if you would like to see a more detailed tutorial or even a video.
Have a wonderfully crafty day!!
Haley

Monday, February 16, 2015

More fun "Catching" up.


For Christmas this year I got several stencils. I must say that I am really loving playing with them.  I has seen video after video where fellow artists were creating the most wonderful master pieces by incorporating them into the pieces. Itchy to give it a try myself. I came up with this:
                                                       
Here is the final project.


 I wanted to make an underwater scene, nice and inky and wavy.  I started by thinking about how in heck I was gonna find and print off the Koi fish that would be just perfect. I went to google images, then headed over to youtube. I watched and looked about a bazillion (4 to be exact, but bazillion is fun to type) videos. I finally came across one that gave me a basic sketch and encouraged me to personalize it from the basic sketch. I am really proud of my drawn Koi fish. I really wanted it to be much more fluid than the one showed in the video. I wanted it to look like the fins were moving with the flow of the water. Once I had the fish drawn I totally freaked out about adding color to it. So, I set it to the side and began working on my backround.
I used  some music paper from an old music book someone gave us ages ago. I gessoed the paper so, that it would be able to take all the product I planned on using. Now that the Gesso was dry I sprayed Lindy's Stamp gang flat fabio sprays in the colors Ocean breeze blue and Caribbean blue with just a few splatters here and there of Tim Holtz distress stains Broken China. This step is where I went just crazy and buck wild (well, for me anyway). I dropped Black India ink unto the paper in large globs and using a straw I blew the ink around. I am really am happy with the way it came out.  Next, I took one of my Crafter's Workshop stencils (Art is) and used some Gloss medium thru the stencil just like you would modeling paste, paint or ink. I really love that it smudged the words just enough for them to not be completely legible. Once that dried I used my Crafter's workshop stencil that has cup rings and spatters to add some modeling paste and back India ink.
Gulp, it was back to the best picture I had drawn from scratch in ages. Well, I pulled up my big girl panties and broke out the water colors and just started moving them around on the image as I held my breath and hoped beyond hope that I would like it in the end. :)  I walked away for night. The next morning I broke out my markers and began outlining and adding in small details like the spots on the fish and his mustache. I cut the image out from the paper that I drew it on, leaving just a small border. I was so happy with it. I used gel medium to decoupage it to my background.  When I added it to my art journal I decided to add a black border. I am glad I did it really makes it pop for me. The last step was to add the "bubbles" and go around them with black ink to help them stand out more.

I hope you enjoyed looking at and reading about the process.
Have a great day,
Haley


Tuesday, February 10, 2015

New project


Hi Everyone!!
Holy moley it has been so VERY long since I posted to my blog. We have moved roughly 1200 miles from where we were in Texas to Wyoming. It is truly lovely here. I am exstatic to tell you that we had a WHITE CHRISTMAS!! It was amazing. Enough about me, how have ya'll been?? I hope each and everyone of you are in good health, peaceful spirits AND filled with love.  I wanted to post some new projects I have been working on. Today's project is one that I will be hosting a class on at the end of February here locally :)  I am SO excited. Gonna be singing that one all day. Bellow are some pictures for you.

                                            I have had this owl for SEVERAL years. This year
                                          one of my goals is to stop hoarding supplies and use
                                          them and enjoy.

I recently started a monthly kit subscription to Flying Unicorn kits. I cannot tell you how awesome the kits are. They have 4 yes, thats right you read that correctly 4 different kinds of kits to choose from. How cool is that?? :)  I used the stencil we got in our kit this month on here. I also used the Shimmerez sprays and paint that came in my kit. A few of the flowers and metal embellishments were also from there. Most of the flowers and supplies came from my stash. I have decided that if want new and exciting ideas and objects to work with then I have to clear out the creative clutter that is already here.  I am so happy that I finally stopped waiting for something "worthy" of my hoarded supplies . I feel so free.
Have many more projects to post of the next few days to play catch-up.
Have an amazing day,
Haley

Sunday, June 23, 2013

Stick Pin

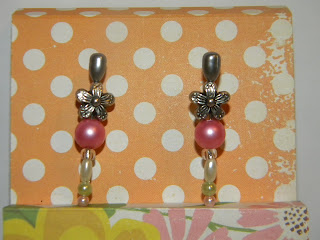
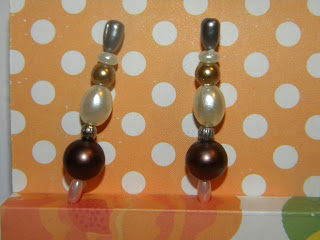
I am involved in a stick pin exchange. The theme was pearls and the colors were vintage. We had to make 4 sets of two. I wanted to send them in a cute box, so here is what I made.

Here is set number one --->

I just love the little spool of thread charm.


<-----  Here we have set number two.
I love the marbled beads. I also thought that the hanging pearls were really neat.


----->  Here is number three

I like the tiny pearls on this one and the flower makes it pretty playful.


<------- Here is set number four.

Nothing but pearls on this set. :)


Here are pics of the matchbook holder I made to house the sets of pins.


Here the matchbox 
Here it is with the belly band


I wanted to jazz up my belly band, so I glittered a butterfly chipboard piece.


Here a side view of the stick pins in the holder.


I hope you make some stick pins.

Happy crafting
Haley